Posts

Showing posts with the label ink

Good Karma

Image
  Sometimes the card-making juju just hits at just the right time. You start making a card and everything seems to fall into place. I had one of those days while creating this card! Please click on the card to appreciate the details! All of the products I mention are Stampin' Up! You can find them on my website, the link is below. I chose a splotched background from the Dainty Flowers DSP that was a free option during SaleABration. My card layers include Crushed Curry 131199 and Mossy Meadow 133676. From the Queen Bee cling stamp set there is a stamp of word gibberish that I stamped onto the background using Crumb Cake ink 147116. The circle with the Bee Hive embossed was a retired embossing folder from Stampin' Up! Also from the Crushed Curry I used the dies that came with the set to add three hive outlines to the card front (the third one is layered onto the bee hive circle. Sentiments are stamped onto Very Vanilla cardstock 101650. with Black Momento ink 132708. Crown and he...
Revisit Acetate Ink Technique

Image
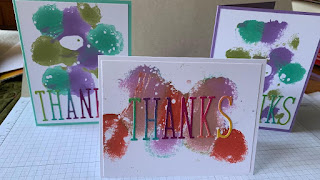
 The holiday decorations are put away (almost all of them!) and I needed six thank you cards so I could write out thank you notes for holiday gifts I received. So I pulled out an older technique--using reinkers and acetate. So first, pull out those old overhead projector sheets you have in the depths of your desk drawer! Alternatively, if you do not have any, they can be ordered on my website https://www.stampinup.com/products/window-sheets?demoid=2187995 For space purposes, I cut my sheet in half. To one side of one sheet, add drops of color from your favorite reinker bottles. I like to use an odd number and chose three colors.   Lay the other half of the acetate sheet on top of the sheet you just added ink to. Watch the magic happen! You can drag your finger across the dots to drag the ink into other open areas. Separate your two acetate sheets and then lay your paper on top. I had some white cardstock cut into 4X5 1/4" rectangles. Allow your inked cardstock time to tho...
Image
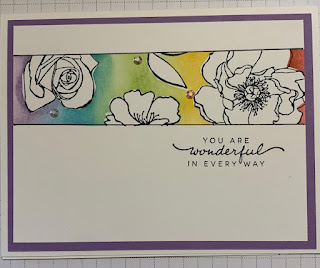
  Happy New Year my friends! I hope you are enjoying your long weekend, and for those of us in the Midwest, our unseasonably warm temperatures. Masking Technique The pictured card I made recently uses two different masking techniques. The first one is simply taking painter's tape horizontally on my card and then sponging a rainbow of colors in between the two pieces of painter's tape. After removing the painter's tape you can ink a sentiment into the stripe or add decorations using markers. If you'd like to take that a step further, to complete a piece like mine on the left, before you sponge on the rainbow of colors for the background in the stripe, stamp some floral images in the white stripe you created between the painter's tape.  Before putting those stamps away, stamp one of each floral image onto some Stampin' Up! masking paper or you can use sticky/post-it notes, making sure that a portion of the stamped design is on the opposite side of the sticky part....