Posts

Showing posts with the label card-making

Welcome Close To My Heart Customers

Image
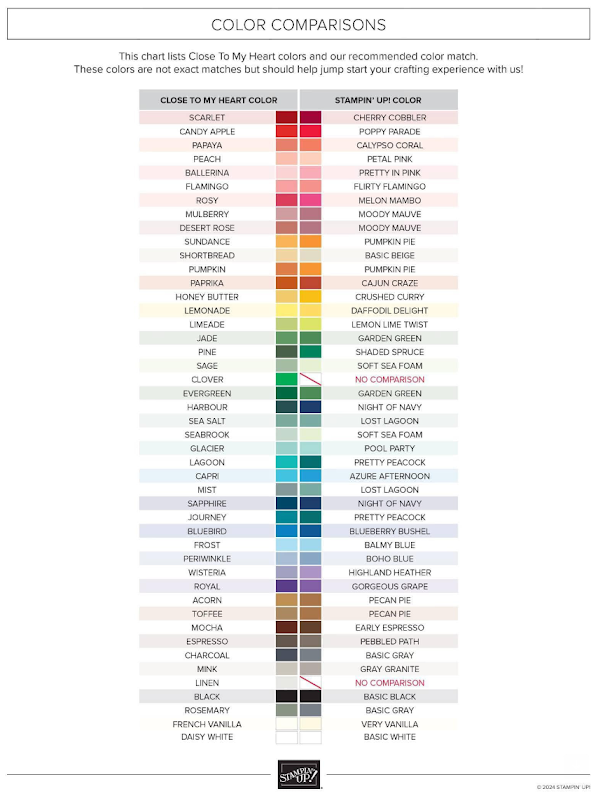
  Earlier this year, we heard that Close To My Heart was closing. Stampin' Up! has managed to work with CTMH and help their reps transition over to Stampin' Up! CTMH reps are able to sell both SU and CTMH products through the remainder of the year. I've seen some videos from corporate that they are creating aids to help with that transition.  Also, Stampin' Up! will add more scrapbooking products instead of just cardmaking products. For those of you who are making the transition, welcome! If I can be of any assistance in your journey, please let me know! Here is a color chart to aid you in your transition. One of the best things about papers from Stampin' Up! is how well they all coordinate. Designer Series Paper (DSP) all match the core cardstock colors that are available. AND, the DSP lists on the back cover all the coordinating cardstock for that set. So have fun exploring all the wonderful new colors and DSP! Explore more on my SU website .

2024 Sale-a-bration! Has Begun!

Image
Our biggest sale event of the year is upon us --> Sale-A-Bration! There are three ways to earn free product-- SHOP --Choose a FREE Sale-A-Bration product from the Sale catalog with every $50 or $100 you spend (before tax and shipping). Shop with me from the catalog or online at Suzanne's Stamping Garden Webpage   HOST --Host a qualifying party and select an additional $30 in FREE products. JOIN --Join Stampin' Up! during Sale-A0-Bration and you can build a Starter Kit full of products you choose, plus you get to select one of two FREE bonus options. Stampin' Up! allows us as demonstrators to preorder before you see the catalog so we can play with the products and generate ideas for our customers. The first stamp set I played with was the Sending Love Bundle. My first creation was this faux step-card. The background was created using DSP (designer series paper) from Fresh As A Daisy (161289). The clouds behind the mailbox were done by hand using the clouds Basic Borders d...

World Card Making Day

Image
If you follow me on social media, you may have noticed an uptick recently in the number of posts I've been doing. I was fortunate to attend some training through Stampin' Up! where they proved to us the more often and consistently we post, the more engagement we will have. And I want you to engage! Yesterday was World Card Making Day. It was so fun to stamp with others from around the world yesterday afternoon and we made three cards together. The beauty of technology! Sara Douglass, our CEO and her daughter Sydney also made some cards using a new suite which you will be able to order soon. Stamping is so much fun, especially when you are in a room filled with like-minded people who enjoy the creative process as much as you do. The October and November class schedule will be posted tomorrow (I am waiting to hear back from a friend on something before I schedule.) Let's make some cards together soon! Take advantage of free shipping this week - October 9 - 11. https://suzanne...

Craft Room?

Image
When was the last time you took inventory of your craft stuff? Are you like me and enjoy more than one craft?  We recently moved and downsized. This past month I've come to realize that if you name a craft--I've probably tried it and bet there is something I can contribute to your stash. One find was a stash of hardanger embroidery items that haven't been touched in a long time! Along with cross-stitch, quilting, beading, diamond painting, items for my 19-year-old's baby scrapbook (that hasn't been started), and of course, my first love, cardmaking. Visualize stuffing a bratwurst into a straw. That is what it is like consolidating it into my new craft room. It is coming along, but not as quickly as I had hoped. I LOVE that I am on the first floor with a couple of windows for natural light. I need to be creative on how this all gets stored. The beauty of this move is that it allows me to be brutal on what to save, what to store for a future project and what I can do...

Good Karma

Image
  Sometimes the card-making juju just hits at just the right time. You start making a card and everything seems to fall into place. I had one of those days while creating this card! Please click on the card to appreciate the details! All of the products I mention are Stampin' Up! You can find them on my website, the link is below. I chose a splotched background from the Dainty Flowers DSP that was a free option during SaleABration. My card layers include Crushed Curry 131199 and Mossy Meadow 133676. From the Queen Bee cling stamp set there is a stamp of word gibberish that I stamped onto the background using Crumb Cake ink 147116. The circle with the Bee Hive embossed was a retired embossing folder from Stampin' Up! Also from the Crushed Curry I used the dies that came with the set to add three hive outlines to the card front (the third one is layered onto the bee hive circle. Sentiments are stamped onto Very Vanilla cardstock 101650. with Black Momento ink 132708. Crown and he...

Color for a Unique Card

Image
  Not too long ago, adult coloring books were all the rage. Most of the books are too large to color and use as card fronts, but if the designs are abstract enough, you could trim it up to make it work. Recently I ordered some magnetic sheets to fit my dies inside of their respective stamp set cases. They were ordered from Honey Bee Stamps. Inside my order was a 'thank you for your order' post card and I decided to color it. Below is the end result - using Stampin' Blends markers, it really brightened up the card! So on days when you aren't feeling particularly creative, try old-fashioned coloring instead. The results can be stunning! Happy Stamping, Suzanne

Valentine's Day Inspiration

Image
The few Valentine cards made this year went out the door early last week, as did the Cupid Care Packages I shipped my two daughters. I was inspired by an envelope Angie Pyjas created. Using some retired designer series paper, this envelope holds three Ghirardelli chocolates. I have to say I wasn't thrilled with the colors for the January Paper Pumpkin. Peach, purple and pink. UGH. So I didn't make any of the Valentines as designed and created some alternatives. (at least this month didn't have the usual treat bags for Valentine's day!) Hopefully your Valentine's Day went well! Corey and I celebrated Taco Tuesday at Cafe Corazon. Very delicious! Happy Stamping! Suzanne

New with Stampin' Up!

Image
  Change can be hard, especially the older we get. But I'm loving the new change with the January - April Mini Catalog. The nicest change at Stampin' Up! is that the dies now are named to match the stamp set it goes with! Prior to this, the dies may have had a similar name but it didn't match 100% as it is now. For instance, I just finished a large project and class using Two Toned Flora stamp set, with the Two Toned Flora matching dies. Because there are no words with that stamp set, I also used the Something Fancy stamp set and matching Something Fancy dies. And the matching DSP (designer series paper) is called Fancy Flora. Another nice change is allowing us to choose between cling or photopolymer stamps with several stamp sets in the January through April Mini Catalog. In the above example on page 18 of the Mini, if you zoom in on the pricing information at the bottom, you will notice that there are two numbers for the stamp set - C for Cling and P for Photopolymer. You...

Use Your Scraps!

Image
  If you are like me, you save some of your bigger scraps of paper while making cards. I also save my strips of white and ivory papers in case I need to stamp a saying. There is a business size envelope on my craft desk and as I cut down my papers, I tuck the strips inside. Well! My envelope of strips is now overflowing, so I decided to use them as a background. I was inspired by HGTV - the trend of having shiplap decorative walls...so I have shiplap on my card background! You can glue or tape your strips any direction--let them overlap your base until you are done.  Once you are done, flip the base over so you can see the base and put it in your trimmer to trim the overlap around each of the four edges. In this example, I used the Fancy Flora stamp set (160844) to add some colorful flowers and leaves with a birthday sentiment.  https://www.stampinup.com/products/two-tone-flora-photopolymer-stamp-set?demoid=2187995 Come join me for a Fancy Flora class this weekend! We wi...

Revisit Acetate Ink Technique

Image
 The holiday decorations are put away (almost all of them!) and I needed six thank you cards so I could write out thank you notes for holiday gifts I received. So I pulled out an older technique--using reinkers and acetate. So first, pull out those old overhead projector sheets you have in the depths of your desk drawer! Alternatively, if you do not have any, they can be ordered on my website https://www.stampinup.com/products/window-sheets?demoid=2187995 For space purposes, I cut my sheet in half. To one side of one sheet, add drops of color from your favorite reinker bottles. I like to use an odd number and chose three colors.   Lay the other half of the acetate sheet on top of the sheet you just added ink to. Watch the magic happen! You can drag your finger across the dots to drag the ink into other open areas. Separate your two acetate sheets and then lay your paper on top. I had some white cardstock cut into 4X5 1/4" rectangles. Allow your inked cardstock time to tho...
Image
  Happy New Year my friends! I hope you are enjoying your long weekend, and for those of us in the Midwest, our unseasonably warm temperatures. Masking Technique The pictured card I made recently uses two different masking techniques. The first one is simply taking painter's tape horizontally on my card and then sponging a rainbow of colors in between the two pieces of painter's tape. After removing the painter's tape you can ink a sentiment into the stripe or add decorations using markers. If you'd like to take that a step further, to complete a piece like mine on the left, before you sponge on the rainbow of colors for the background in the stripe, stamp some floral images in the white stripe you created between the painter's tape.  Before putting those stamps away, stamp one of each floral image onto some Stampin' Up! masking paper or you can use sticky/post-it notes, making sure that a portion of the stamped design is on the opposite side of the sticky part....

New Year - More Stamping

Image
When I retired in July 2022, one goal I had was to work on the digital footprint for my business. I've discovered much about myself in the months since my retirement. The driven, early morning worker I was, is now a lazier, laid-back retiree! Crafting has always been my creative outlet. Crafting has also been a heavy influence in my life since I was in 4H as, a kid. Crocheting, sewing, quilting--any craft that struck my fancy. Lately though, my focus has been jewelry- and card-making. Occasionally I stray off and do something different, but for the most part, card-making is my main focus. Stay tuned for weekly (or more often) card creations for now, but more projects in the future where you will be able to create along with me. There are numerous plans stewing in my subconscious, but it all takes time to put into place. Please check the Events section of my Stampin' Up! website for upcoming classes in January and February. suzannestamps.stampinup.net So what are your New Year r...