Happy New Year my friends!
I hope you are enjoying your long weekend, and for those of us in the Midwest, our unseasonably warm temperatures.
Masking Technique
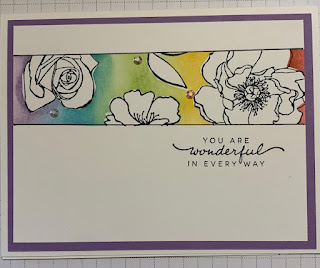
The pictured card I made recently uses two different masking techniques. The first one is simply taking painter's tape horizontally on my card and then sponging a rainbow of colors in between the two pieces of painter's tape. After removing the painter's tape you can ink a sentiment into the stripe or add decorations using markers.
If you'd like to take that a step further, to complete a piece like mine on the left, before you sponge on the rainbow of colors for the background in the stripe, stamp some floral images in the white stripe you created between the painter's tape. Before putting those stamps away, stamp one of each floral image onto some Stampin' Up! masking paper or you can use sticky/post-it notes, making sure that a portion of the stamped design is on the opposite side of the sticky part. Fussy cut each stamped sticky note and then place the sticky floral image on top of its match on the card. THEN, using your sponges, add your rainbow of ink. Once the rainbow is in your stripe, peel off the stickies (Don't throw them away! I keep mine on the inside cover of the matching stamp set for future use.) Carefully peel off the painter's tape.
Here is where you can find the blending brushes in my store:
Larger brushes - https://www.stampinup.com/products/blending-brushes?demoid=2187995
Masking paper - https://www.stampinup.com/products/stampin-up-masking-paper?demoid=2187995
New, smaller brushes - https://www.stampinup.com/products/small-blending-brushes?demoid=2187995
To add some final pizzazz, using a ruler, you can add two horizontal lines with a black marker to outline your stripe, stamp a sentiment and add an odd number or rhinestones or sequins. Ta Da!
I'm glad you stopped by - have a productive week and a great year ahead!
Suzanne


Comments
Post a Comment